I have recently started getting my hands a bit dirty with the electronics. To start with, I bought a Arduino UNO, Arduino Nano, CubieBoard 3 (CubieTruck), Raspberry Pi Zero W & a couple NodeMCUs. I am still into in-depth learning how these electronics work. When trying to use one of my NodeMCU with the Arduino IDE (they said it was compatible so it's convenient), I found its not very straight forward to get it working in first attempt.

In this blog post, I will try to write the exact steps that were need to get it working along with a minimal example to test. This tutorial assumes you got a Windows (10) PC. Linux/Mac users should be able to adapt most of this write-up to their systems accordingly. Let's start!
First you need to get yourself a ESP8266/NodeMCU board. You can buy one from Amazon (India/International) or any other website/place you like. Along with the board, make sure to get yourself a Micro-USB cable to connect the board with PC. When it comes to cable, I just prefer those from AmazonBasics. Always the top-notch quality and choice of black/white color (am I doing promotions here? :D Nope, I just love it so much). Also buy a breadboard and a simple LED required for the example program to run.
Once it arrives, download and install the Arduino IDE on your PC from here. Before you connect your board to PC, you will also need to download and install USB to UART drivers from here to get the serial/COM port working.
Launch Arduino IDE. Go to File, Preferences, Settings (Tab). Put below URL in additional board manager URLs:
http://arduino.esp8266.com/stable/package_esp8266com_index.json
Click OK. Go to Tools, Board, Board Manager. In the filter box at the top, type ESP8266 and install the esp8266 package by ESP8266 Community.
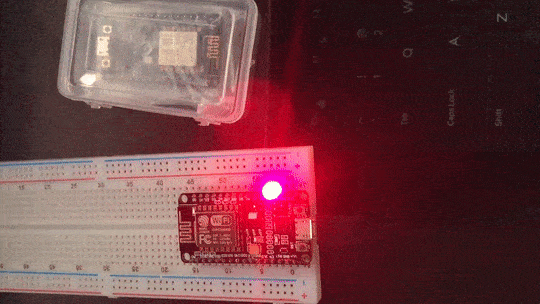
Not put your NodeMCU in the center of any breadboard end and connect the LED to GND and D8 (GPIO 15) as shown below:

Connect the board to the PC using a/the Micro-USB cable. Go to Tools, Board, select NodeMCU 0.9 (ESP-12 Module). Go to Tools, Port & select COMX port on which the board is connected to PC.
Replace below example code into your Sketch in Arduino IDE.
Hit the Upload button to compile + push your program to the board and run it! You should see the LED blinking or maybe not if anything messed up. Ask me in comments if you encounter issues!


In this blog post, I will try to write the exact steps that were need to get it working along with a minimal example to test. This tutorial assumes you got a Windows (10) PC. Linux/Mac users should be able to adapt most of this write-up to their systems accordingly. Let's start!
First you need to get yourself a ESP8266/NodeMCU board. You can buy one from Amazon (India/International) or any other website/place you like. Along with the board, make sure to get yourself a Micro-USB cable to connect the board with PC. When it comes to cable, I just prefer those from AmazonBasics. Always the top-notch quality and choice of black/white color (am I doing promotions here? :D Nope, I just love it so much). Also buy a breadboard and a simple LED required for the example program to run.
Once it arrives, download and install the Arduino IDE on your PC from here. Before you connect your board to PC, you will also need to download and install USB to UART drivers from here to get the serial/COM port working.
Launch Arduino IDE. Go to File, Preferences, Settings (Tab). Put below URL in additional board manager URLs:
http://arduino.esp8266.com/stable/package_esp8266com_index.json
Click OK. Go to Tools, Board, Board Manager. In the filter box at the top, type ESP8266 and install the esp8266 package by ESP8266 Community.
Not put your NodeMCU in the center of any breadboard end and connect the LED to GND and D8 (GPIO 15) as shown below:

Connect the board to the PC using a/the Micro-USB cable. Go to Tools, Board, select NodeMCU 0.9 (ESP-12 Module). Go to Tools, Port & select COMX port on which the board is connected to PC.
Replace below example code into your Sketch in Arduino IDE.
Hit the Upload button to compile + push your program to the board and run it! You should see the LED blinking or maybe not if anything messed up. Ask me in comments if you encounter issues!